Mastering Photography in Manual Mode for Stunning Rental Photos
Taking control of your camera's manual mode is the biggest upgrade you can make to your property photos. It’s the difference between letting your camera guess what your space looks like and telling it exactly how to capture the bright, inviting feel you see with your own eyes. This is where you leave flat, uninspired auto-mode photos behind for good.
Why Manual Mode Is Your Secret to More Bookings
Let's get real for a moment. Your phone's camera is pretty clever, but it’s not designed to capture the unique soul of a room. It sees a bright, sun-drenched window next to a cozy, shadowed corner and tries to split the difference, often creating a bland, lifeless image that helps nobody.
I learned this lesson the hard way. My first set of photos made my charming little getaway look like a dark, depressing cave. The automatic settings completely failed to balance the bright windows with the warm interior, and the pictures just didn't do the place justice. I could practically hear the sound of potential guests scrolling right past my listing.
Switching to manual mode is the single most powerful change you can make. It’s not about becoming a pro photographer overnight. It's about learning a few simple controls to tell a more honest and compelling story with light.
Your Creative Toolkit for Better Photos
Think of photography in manual mode as your creative toolkit, not some scary technical challenge. When you're in the driver's seat, you can make intentional choices to:
- Capture the Ambiance: Make your space feel as bright, spacious, and welcoming as it does in person.
- Show Off the View: Stop that beautiful mountain vista outside the window from becoming a blown-out, white rectangle.
- Highlight Key Features: Draw the eye to that cozy reading nook or the sleek new kitchen appliances you invested in.
It’s no surprise that while smartphones now account for an incredible 92.5% of all photos taken, professional photographers still depend on manual mode for their most important work. For at least half of their commercial shoots, they reach for dedicated cameras where they have full control—a necessity for something as crucial as vacation rental photography. You can dig into more photography industry statistics to see just how vital that manual control remains.
This is your 'aha!' moment. It’s where you realize incredible photos aren’t about buying a more expensive camera, but about understanding a few simple adjustments that anyone can learn.
We're about to walk through the three key settings: Aperture, Shutter Speed, and ISO. Don't let the terms intimidate you. We’ll break them down into simple tools you can use to craft images that stop scrollers in their tracks and turn them into paying guests.
Decoding The Exposure Triangle For Perfect Interiors
Alright, let's get into the heart of shooting in manual mode: the Exposure Triangle. Forget the dense technical jargon. Think of this as the three essential controls—Aperture, Shutter Speed, and ISO—that you'll use to perfectly balance the light in any room.
Once you get a feel for how these three settings play off each other, you've unlocked the secret to consistently great property photos. It's about taking control and telling the camera exactly what you want it to capture, rather than letting it guess.
This simple diagram shows how these three elements are completely intertwined.
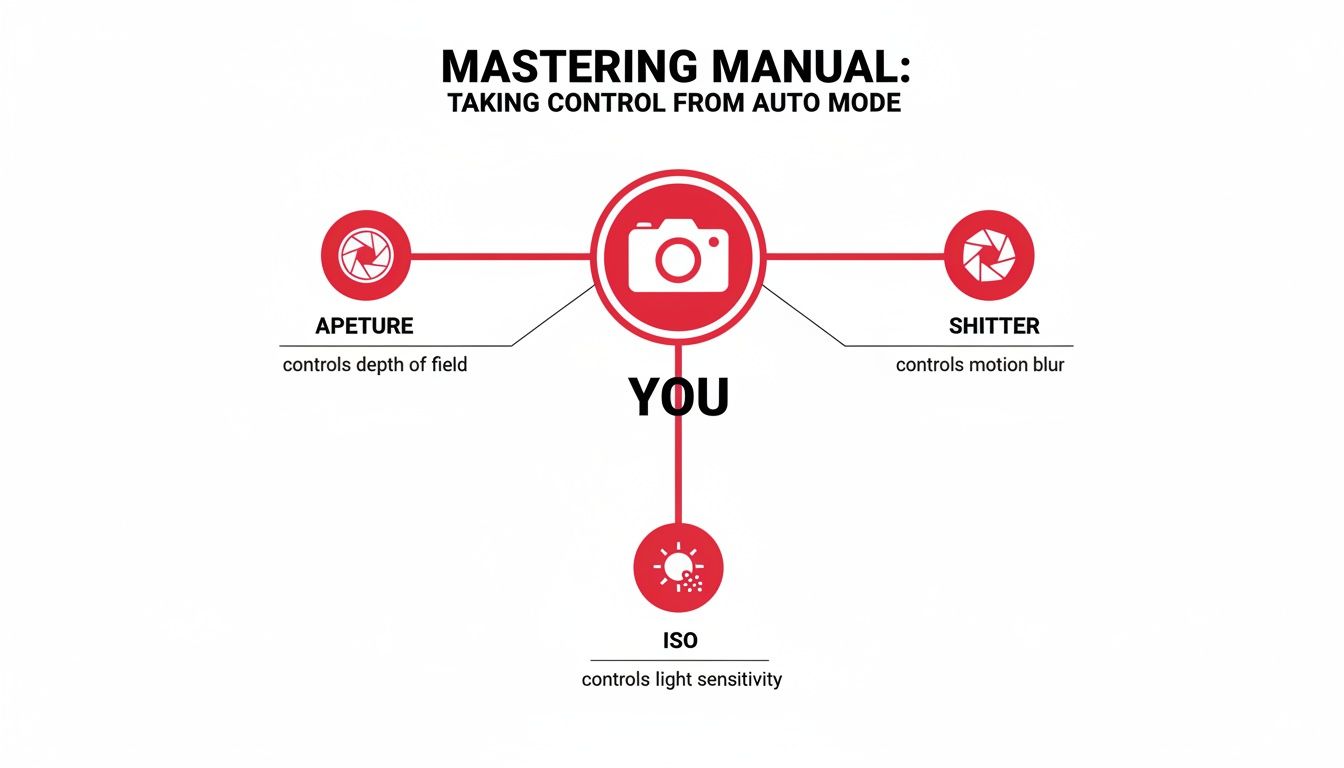
The key takeaway here is that you can't change one setting without affecting the others. It's a balancing act, and you're the one in charge.
Aperture: Your Secret To A Super-Sharp Room
I always start with Aperture because for interior photography, it's arguably the most critical setting. Think of it like the pupil of your eye—it opens wide in the dark to let more light in and shrinks to a pinpoint in bright sun.
Your camera's aperture works the same way, measured in f-stops (e.g., f/4, f/8, f/11). The only slightly confusing part is that the numbers work backward: a small f-stop number (like f/4) means a wide-open aperture, letting in tons of light. A large f-stop number (like f/11) means a tiny opening, letting in much less light.
But for our purposes, aperture does something far more important: it controls the depth of field. That’s just a technical term for how much of your photo is in sharp focus, from the things right in front of you to the back wall.
For property photos, you want everything sharp. From the couch cushion in the foreground to the view out the window in the background, it all needs to be crystal clear. To get that, you need a larger f-stop number.
The sweet spot for nearly all interior photography is between f/8 and f/11. This range guarantees a deep depth of field, making the entire space look crisp and inviting to potential guests.
Shutter Speed: Capturing Light Over Time
Next up is Shutter Speed. This is simply how long your camera's sensor is exposed to light. A fast shutter speed (like 1/1000s) is like a quick blink, freezing motion. A slow shutter speed (like 1 full second) is like holding your eye open, letting the sensor "soak up" all the available light.
Since many interiors are relatively dim, even with the lights on, we often need to use a slower shutter speed to get a bright, well-lit image.
This is exactly why a tripod is non-negotiable. If you try to hand-hold a camera at a shutter speed slower than about 1/60th of a second, the tiny, natural shake of your hands will create a blurry mess. But pop that camera on a tripod, and you can leave the shutter open for 1, 5, or even 30 seconds to make a dark room look absolutely radiant.
ISO: Your Digital Brightness Boost
Finally, we have ISO. The simplest way to think of ISO is as a digital brightness boost. After you've set your aperture and shutter speed, if the photo is still too dark, you can raise the ISO to artificially brighten the whole image.
So, why not just crank the ISO every time? There’s a catch.
The higher the ISO, the more digital "noise" (or grain) you introduce. At high levels, this noise can make your photos look splotchy and cheap. For professional-looking interior shots, the goal is always to keep the ISO as low as humanly possible for the cleanest result.
- Always start at your camera's base ISO, which is typically 100 or 200.
- Only raise it as a last resort if you can't get a bright enough shot by adjusting the other two settings.
- As a rule of thumb, try to stay below ISO 800 to avoid obvious graininess.
Recommended Manual Mode Starting Points for Interiors
Use these settings as a baseline for different interior lighting conditions. Adjust one variable at a time to perfect your exposure.
| Lighting Scenario | Aperture (f-stop) | Shutter Speed | ISO | Key Goal |
|---|---|---|---|---|
| Bright, Sunlit Room | f/8 - f/11 | 1/60s - 1/4s | 100 | Maximize sharpness, minimize noise. |
| Well-Lit, No Direct Sun | f/8 - f/11 | 1/4s - 1s | 100-200 | Balance brightness with sharpness. |
| Dimly Lit Room | f/8 | 1s - 5s+ | 200-400 | Let in enough light without excessive noise. |
| Room with Window Views | f/11 | Bracketed Exposures* | 100 | Capture detail both inside and outside. |
*We'll cover bracketing in detail later. It involves taking multiple shots at different shutter speeds.
Mastering this simple dance between Aperture, Shutter Speed, and ISO means you’re no longer just taking snapshots—you're crafting images. You're making deliberate choices to show off your property in its best possible light, and that's what gets bookings.
Getting the Light Right: Your Meter and Histogram
Once you get a feel for the exposure triangle, it's time to meet your two best friends for judging light: the light meter and the histogram. Honestly, mastering these is the real secret to shooting with confidence in manual mode. I think of them as my camera’s built-in lie detectors, telling me exactly what's happening with the light before I even press the shutter.
Don't just trust what you see on the camera's screen. Your eyes can easily be fooled, especially when you're walking from a bright living room into a darker bedroom. These tools give you the hard data you need for a perfect exposure, every single time.
Your Camera's Light Meter: The Starting Point
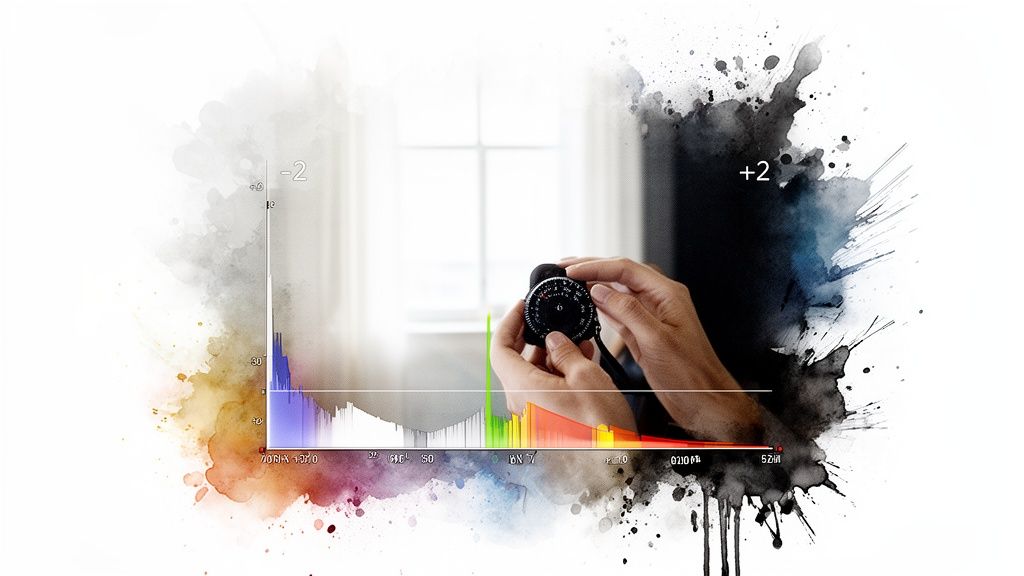
Think of the light meter as your 'Goldilocks' guide. It’s that little scale you see at the bottom of your viewfinder, usually running from -2 to +2 with a zero right in the middle. Its only job is to tell you if the camera thinks your shot will be too dark, too bright, or just right with your current settings.
- At -2 or -1: The camera is telling you the shot will be underexposed (too dark).
- At 0: The camera thinks you have a perfectly balanced exposure.
- At +1 or +2: This is a warning that your image will be overexposed (too bright).
Your first goal is to adjust your aperture, shutter speed, or ISO until that little indicator is sitting happily at zero. This gives you a great baseline for a well-exposed shot. But the meter isn't foolproof, especially with tricky interior lighting. For a deeper dive, our guide on lighting for photography can help.
The Histogram: Reading the Unfiltered Truth
If the light meter is a helpful suggestion, the histogram is the absolute, unvarnished truth about your photo's brightness. It might look like a confusing little mountain range, but it's incredibly simple once you know what you're looking at. The graph just shows how the tones are spread out in your image, from pure black on the far left to pure white on the far right.
A healthy histogram for an interior photo usually looks like a gentle hill that doesn't crash into either side. This tells you that you’ve captured detail in both the darkest corners and the brightest windows, with no information lost.
This ability to see data in real-time is a huge reason photographers are flocking to mirrorless cameras. The global photography equipment market is expected to hit over USD 136 billion, driven by a massive 14.5% jump in mirrorless camera shipments as DSLRs fade out. Modern cameras let you see the live histogram right in the viewfinder—something a smartphone just can't do.
Spotting Problems Before You Even Shoot
The real magic of the histogram is its ability to warn you about the most common problems in rental photography before you take the picture.
Problem 1: "Crushed Blacks"
- What it looks like: A dark room where the shadows have all smudged together into a single, detail-less black blob.
- What the histogram shows: A big spike slammed up against the far-left side of the graph.
- The fix: You need more light. Slow down your shutter speed or, if you have to, bump up the ISO until that spike pulls away from the edge.
Problem 2: "Blown-Out Highlights"
- What it looks like: The classic amateur mistake—a window that looks like a solid white rectangle with zero detail of the beautiful view outside.
- What the histogram shows: A sharp spike pushed all the way to the far-right wall.
- The fix: You've got too much light coming in. Increase your shutter speed to let less light in until that spike on the right moves back into the graph.
Learning to give your histogram a quick glance is a total game-changer. It turns photography in manual mode from a guessing game into a precise science. You'll know for sure that every photo you take has all the data you need to edit it into a stunning, booking-magnet image.
Essential Techniques for Tack-Sharp and Vibrant Photos
Once you've got the basics of exposure down, it's time to add a few more hands-on techniques to your toolkit. These are the little things that make a huge difference, turning good photos into the kind of professional shots that stop scrollers in their tracks. Think of this as the final polish that makes your property look its absolute best.
Why a Tripod Is Non-Negotiable
Let’s get one thing straight: besides your camera, a solid tripod is the most important piece of gear you'll own for this. When we shoot interiors in manual mode, we rely on slow shutter speeds to soak up all the available light. But even the slightest vibration—like your finger pressing the shutter button—will turn your photo into a blurry mess.
A tripod completely eliminates that camera shake. It gives you the freedom to use those long, light-gathering shutter speeds to make even a dim room feel bright, open, and airy. It’s the secret to getting perfectly sharp images, every single time.
You don't need to break the bank, either. Look for something stable and easy to adjust. I've had great results with budget-friendly brands like K&F Concept or Manfrotto's entry-level tripods; they offer fantastic stability for the price.
Bracketing: Your Secret Weapon for Tricky Windows
Have you ever tried to photograph a room with a beautiful window view? You either get the room perfectly lit while the view outside is a blown-out white blob, or you expose for the view and the room becomes a dark cave. This is where bracketing becomes a total game-changer.
Bracketing is simply taking a series of photos at different brightness levels—usually one dark, one medium, and one bright. The good news is most cameras can do this for you automatically with an "Auto Exposure Bracketing" (AEB) setting.
- First, find the AEB setting in your camera’s menu.
- Next, set it to take 3 or 5 separate photos.
- Finally, use your camera’s self-timer to trigger the shutter so you don't touch the camera and cause any shake.
Later on, you can blend these photos together in editing software. The result is one stunning image where both the interior details and the outdoor view are perfectly exposed.
Conquer White Balance for True-to-Life Colors
Your camera’s "Auto White Balance" (AWB) tries its best, but it often gets confused by the mix of warm artificial light and cool daylight coming through windows. That confusion is what creates those ugly yellow or orange color casts that make a space feel dated and dingy. Taking control of your White Balance is how you get accurate, appealing colors.
Instead of just leaving it on Auto, dive into your camera's menu and try one of the presets.
- Tungsten/Incandescent: This is your go-to for rooms lit with standard warm, yellow-ish light bulbs.
- Fluorescent: Use this preset if you have fluorescent tube lighting.
- Daylight/Sunny: Perfect for rooms that are flooded with natural light.
- Custom White Balance: This is the most accurate method. You simply take a photo of something pure white (like a piece of paper) in the room to "teach" your camera what true white looks like in that specific lighting.
Getting your White Balance right in-camera saves you a massive headache during editing. It ensures wall colors are true, whites are crisp, and the entire room feels natural and inviting.
Shoot in RAW for Maximum Editing Power
Finally, let’s talk about file types. Your camera is probably set to save photos as JPEGs by default. A JPEG is a compressed, "finished" photo where the camera has already made permanent decisions about color, sharpness, and brightness for you.
A RAW file, on the other hand, is like a digital negative. It's a much larger file that contains all the raw, unprocessed data from your camera's sensor. This gives you unbelievable flexibility when you go to edit.
Why is this so important for rental photos?
- Recover Details: You can easily brighten up dark shadows or pull back details from a bright window that would be lost forever in a JPEG.
- Perfect White Balance: If you forgot to set the white balance correctly, you can fix it perfectly in a RAW file with a single click.
- Total Control: You have far more power over color, contrast, and sharpening to really nail that polished, professional look.
Manual mode remains a cornerstone for professionals who need absolute precision—something that's crucial in a competitive rental market. As technology evolves, we're seeing a huge shift; mirrorless camera shipments recently jumped by 14.5% while DSLRs fell 19.8%. These newer mirrorless cameras are fantastic because their electronic viewfinders show you the exposure in real-time, making it easier than ever for hosts to master photography in manual mode. You can find more insights on the evolving photography equipment market.
Mastering stabilization, bracketing, color control, and shooting in RAW is what separates amateur snapshots from professional property photography. For more on prepping your space, take a look at our guide on the best lighting equipment for photography.
A Simple Editing Workflow for Magazine-Worthy Results
The magic of manual mode doesn't stop when the shutter clicks. In fact, that's just the beginning. The shot you capture in-camera is the raw clay, and a few simple editing steps are what will sculpt it into a polished, magazine-worthy image that stops scrollers in their tracks.
Don't worry, this isn't about spending weeks learning complicated software or creating a fake version of your property. My goal is to give you a quick, repeatable workflow that focuses on what you actually need to make your photos pop and drive more bookings.
It's all about making the final image an honest, compelling, and beautiful representation of the amazing experience you offer.
The Power of Exposure Blending
Remember those bracketed shots we took earlier? This is where they come into play. Exposure blending might sound technical, but it's really just combining your dark, medium, and bright photos into one perfectly exposed image.
Most modern editing software, like Adobe Lightroom, makes this incredibly easy with a "Merge to HDR" function. You just select your bracketed photos, click a button, and the software intelligently stitches together the best parts of each one:
- It pulls the beautiful, detailed view from your darkest photo (the one where the window wasn't a white blob).
- It grabs the rich details hiding in the shadows from your brightest photo (where the dark corners of the room are perfectly visible).
- It uses the middle photo to get a balanced, natural overall tone.
The final product? One incredible photo that looks just like what you see with your own eyes—a room that’s cozy and inviting on the inside with that stunning view perfectly preserved.
Your Five-Minute Editing Checklist
Once your shots are blended, you’re just a few tweaks away from perfection. Here’s a quick checklist I run through for a professional finish on every photo.
Adjust Brightness and Contrast: Your blended image might still look a bit flat. Gently nudge the brightness up to make it feel airy and add a touch of contrast to make the textures and details pop. A subtle lift is all you need—the goal is natural, not nuclear.
Correct Wall Distortion: Shooting with a wide-angle lens can sometimes make vertical lines, like walls and door frames, look like they're leaning inward. Look for a one-click "Upright" or "Lens Correction" tool in your editing program. It will instantly straighten everything out, giving your photos that clean, architectural look.
Boost Vibrancy (Not Saturation): To make your colors look rich without screaming fake, always reach for the "Vibrancy" slider instead of "Saturation." Vibrancy is smarter; it focuses on boosting the muted colors while leaving the already-strong ones alone. This gives your decor a healthy pop without looking cartoonish. For a deeper dive, our guide on what white balance is in photography is a great resource.
Add a Touch of Sharpening: The final touch is to add just a little bit of sharpening. This makes the edges crisp and gives the whole image a high-quality, professional feel that guests will notice.
By starting with a great photo captured in manual mode, you're giving yourself—or a professional editing service—the best possible raw material. A well-exposed RAW file has all the data needed to create consistent, high-end images that will make your entire listing look cohesive and premium.
Answering Your Questions About Manual Mode
Jumping into manual mode can feel a little intimidating at first, almost like you're learning a new language. It's completely normal to run into a few hurdles. Let's walk through some of the most common questions and frustrations I hear from hosts, so you can start shooting with a lot more confidence.
What’s the Best Camera and Lens to Start With?
Good news: you don’t need to spend a fortune to get stunning results. A fantastic starting point is a mirrorless camera, something like a Sony a6000 series or a Canon EOS M or R series. They’re smaller, and the digital screen is a game-changer for learning because it shows you exactly how the final photo will look as you tweak the settings.
The lens is just as important. You'll want to pair your camera with a solid wide-angle lens—think something in the 10-22mm range for smaller (APS-C) sensors or 16-35mm for full-frame cameras. This range is the sweet spot for capturing an entire room without distortion, making your spaces feel bright and expansive. And don't shy away from buying used gear; it's a brilliant way to get high-quality equipment without the high price tag.
Why Are My Photos Blurry Even Though I’m Using a Tripod?
Ah, the classic mystery! This is one of the most common and maddening issues people face. If your camera is locked down on a sturdy tripod, the blur is almost always caused by the tiny vibration from your finger pressing the shutter button. With the slow shutter speeds we use for interiors, that little shake is all it takes to soften the image.
Luckily, the solution is dead simple: use your camera’s built-in timer.
Set a 2-second or 10-second delay. Frame your shot, press the shutter, and take your hands off the camera. This gives it a couple of seconds for any and all vibrations to die down before the picture is taken. It's a tiny change in your process that makes a world of difference.
How Can I Make My Lighting and Colors Look the Same in Every Photo?
Consistency is the secret sauce to a professional-looking listing. First things first, try to schedule your entire photoshoot around the same time of day. This gives you a consistent base of natural light to work with.
Next, you need to nail your color. Don't rely on 'Auto White Balance.' Instead, set a custom white balance. Just take a quick photo of a plain white or gray card in the room's light, then go into your camera menu and use that image to set the white balance. This one step ensures your wall colors are true-to-life and consistent from the living room to the bedroom.
And finally, it's not a bad idea to just jot down your main settings (aperture, shutter speed, ISO) for each room. That way, if you need to reshoot a space later, you know exactly where to start.
Should I Use Natural Light or Turn On the Lamps?
This is a great question. Natural light is your best friend—it creates that bright, airy, and welcoming vibe that guests love. But sometimes, turning on interior lamps can add a touch of warmth and coziness that really sells the space.
The main challenge here is that lamps usually give off a warm, yellowish light, while daylight is much cooler and bluer. This mix of "color temperatures" can really confuse your camera's sensor.
A great approach is to take two versions of the shot: one with only natural light and another with the lamps on. This gives you options later. If you do use lamps, just make sure all the lightbulbs are the same type. Mixing different bulbs creates a color nightmare that's a real headache to fix in editing.
Feeling a bit in over your head? If you've got the manual mode basics down but just don't have the time to edit, rental.photos can handle the final polish. Simply upload your bracketed shots, and our team of professional editors will deliver incredible, booking-ready images in under 24 hours. Check out our photo enhancement service to see how we can help.
Ready to have professional photos?
Our team transforms your existing rental photos into stunning, high-converting images that bring you more bookings. No photoshoot required. 100% refund guaranteed.
Improve My Photos →